(Part. 1) tensorflow 2.0 betaでtransformerをつかって言語生成chatbotをつくりたい
tensorflow2.0のベータ版が公開されたので、慣れるためにtransformerを学習させて、言語生成を試して見たいと思います。 collaboratoryを使ってGPUで学習させます。
transformer
transformerはencoder-decoder型、つまり、seq2seqに類似したモデルになっています。 特徴的なのは、なんといってもself-attention機構です。これは、系列データの関係性や文中のどこが重要かを学習できる可能性があると期待されています。 また、deep learning界隈の自然言語界隈で大注目のBERTにも使われており、必須な知識となると思います。
encoder-decoderモデル
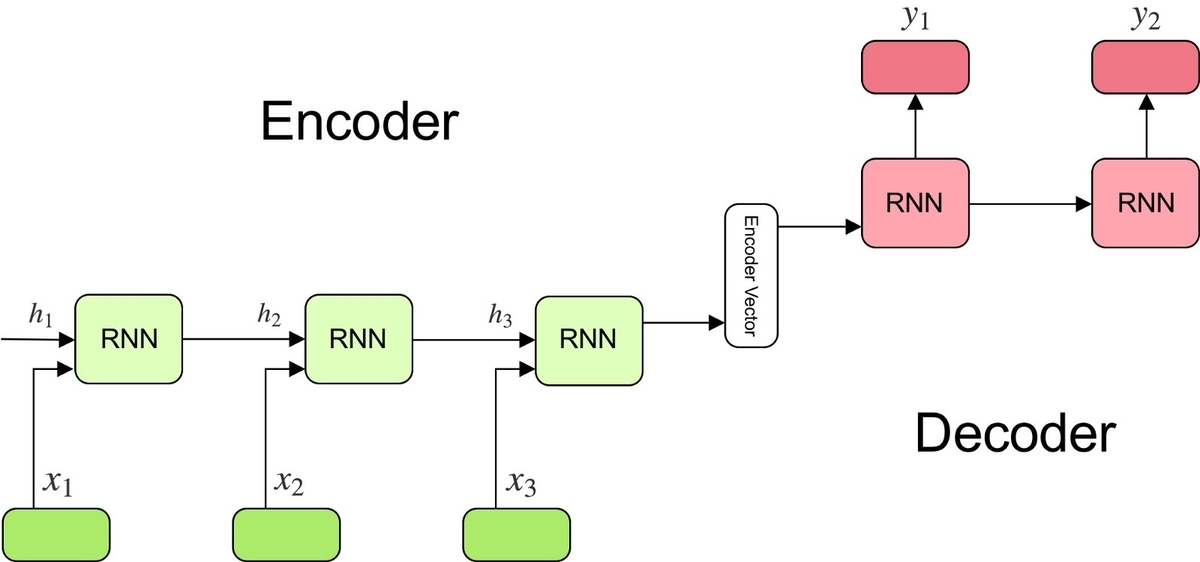
transformerの基本となるencoder-decoderモデルは上図のような構造をしています。入力文を分かち書きし、頭から順にRNN型のencoderに入力して、encoder vectorと呼ばれる特徴量ベクトルを取得します。それをRNN型のdecoderに入力し、出力文を再帰的に予測させます。
transformerモデル
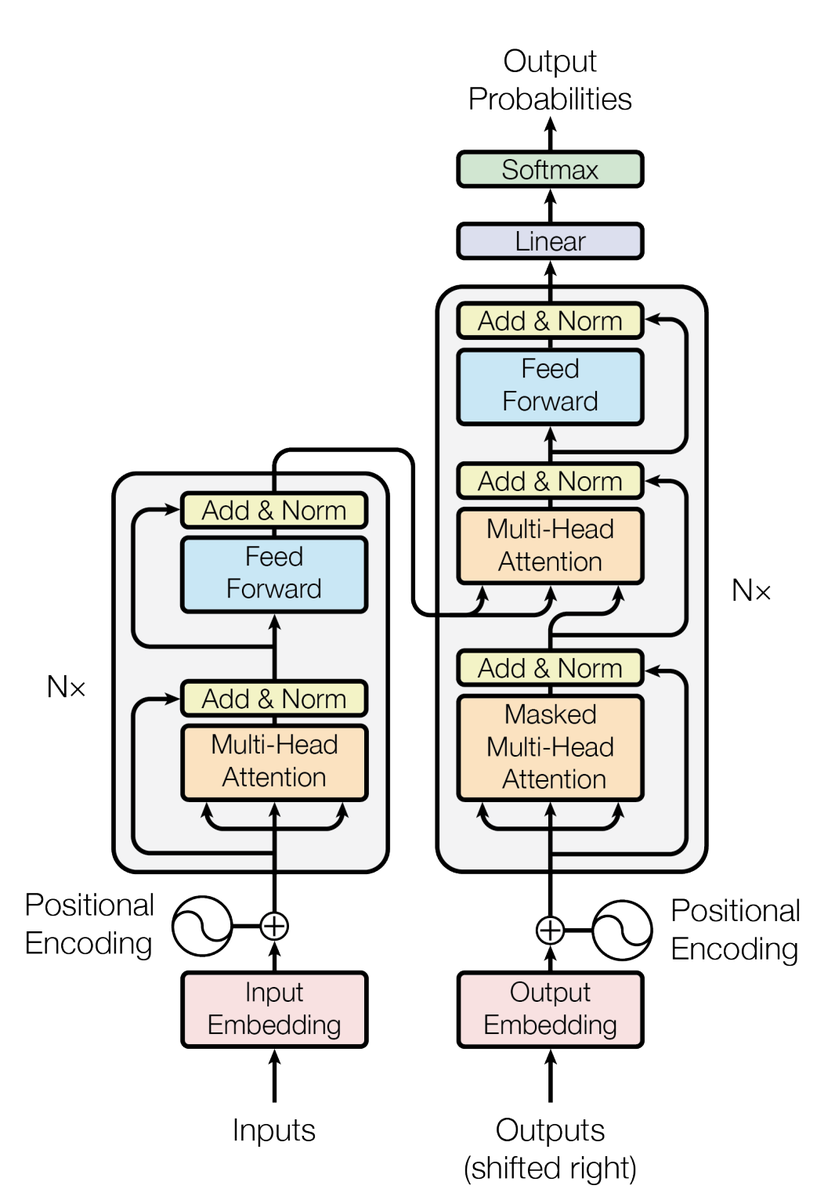
transformerは上図の構造をしています。左側がencoder、右側がdecoderとなっています。 注目は以下の3つだと思います。
- Masking
- Multi-Head Attention
- Positional Encoding
以下、順を追って実装していきます。
tensorflow2.0betaのinstall
from __future__ import absolute_import, division, print_function, unicode_literals

!pip install tensorflow-gpu==2.0.0-beta1
# cpuを使う場合は以下
# !pip install tensorflow==2.0.0-beta1

import tensorflow as tf
デフォルトでeager excecutionが有効になっているので、以下のように簡単に動作を確認することができます。
import numpy as np

inputs = np.array([[0.1, 0.3, 0.4], [0.1, 0.1, 0.2]])
out = tf.keras.layers.Dense(100)(inputs)
print(out.shape)
# >>> (2, 100)
print(out[0][:2])
# >>> tf.Tensor([0.06784311 0.00688465], shape=(2,), dtype=float64)
Masking
padding mask
encoder-decoderモデルは入出力の次元が固定である。しかし、言語の文字列長は可変であるのでデータにpaddingを与えて(0埋めして)、最大文字列の長さに増やさなければいけない。 そのためのhelper関数を実装する。
def create_padding_mask(x):
    """
    masking as follows,
    0 to 1.,
    others goes to 0.
    1がmaskされる
    """
    mask = tf.cast(tf.math.equal(x, 0), tf.float32)
    # (batch_size, 1, 1, sequence length)
    return mask[:, tf.newaxis, tf.newaxis, :]
出力例:
print(create_padding_mask(tf.constant([[1, 2, 0, 3, 0], [4, 5, 0, 0, 0]])))
# >>> tf.Tensor(
[[[[0. 0. 1. 0. 1.]]]
 [[[0. 0. 1. 1. 1.]]]], shape=(2, 1, 1, 5), dtype=float32)
look ahead masking
decoderは各系列の出力が次の系列の入力に使われるため、各系列に対して自身よりも後ろの系列の入力を無効化してattentionの計算をしなければいけない。そのためのhelper関数を実装する。
def create_look_ahead_mask(x):
    """
    mask the future tokens in a sequence
    1がmaskされる
    """
    seq_len = tf.shape(x)[1]
    look_ahead_mask = 1 - tf.linalg.band_part(tf.ones((seq_len, seq_len)), -1, 0)
    padding_mask = create_padding_mask(x)
    return tf.maximum(look_ahead_mask, padding_mask)
出力例:
print(create_look_ahead_mask(tf.constant([[1, 2, 0, 4, 1]])))
# >>> tf.Tensor(
[[[[0. 1. 1. 1. 1.]
   [0. 0. 1. 1. 1.]
   [0. 0. 1. 1. 1.]
   [0. 0. 1. 0. 1.]
   [0. 0. 1. 0. 0.]]]], shape=(1, 1, 5, 5), dtype=float32)
Multi-Head Attention

scaled dot-product attention
transformerで用いられるmuti-head attentionはscaled dot-product attentionというattentionが使われています。 式で書くと、
です。tensorflowではよく似た名前の関数が用意されているのでこの式をそのまま書きます。なお、後ほど説明しますが、マスク処理用に、softmax関数に入れると0になるように途中でものすごく小さい値を代入できるような処理を書いておきます。
また、インプットのshapeですが、一番後ろの次元が特徴量ベクトルの次元にあたる部分で、ここだけ計算に使います。
def scaled_dot_product_attention(query, key, value, mask=None):
    """
    formation:
    sdp-attention := attention_weight * value,
    ここで, attention_weight := softmax(mask(normalize(query * key_T)))
    注意: maskはoptional

    input:
    query=shape(batch, head, ?, emb_in_head), float32
    key=shape(batch, head, ?, emb_in_head), float32
    value=shape(batch, head, ?, emb_in_head), float32
    mask=shape(batch, head, ?, emb_in_head), boolean

    output:
    scaled dot product attention: shape(batch, head, ?, emb_in_head)
    """
    matmul_qk = tf.matmul(query, key, transpose_b=True)

    nor_k_size = tf.cast(tf.shape(key)[-1], tf.float32)

    logits = matmul_qk / tf.math.sqrt(nor_k_size)

    if mask is not None:
        # if the elements in mask equals zero,  then goes to zero after appling softmax.
        # for that reason, the small value close to negative infinity is assigned to non-masked logits
        logits += mask * -1e9

    attention_weight = tf.nn.softmax(logits, axis=-1)
    return tf.matmul(attention_weight, value)
multi-head attention
以上で、multi-head attentionを実装する準備ができました。
この層にはbatchと埋め込み次元を持ったデータ入力されます。そして、埋め込み次元を分割して、scaled dot-product attention層に入力します。各層をheadと呼びます。このようにmultiなheadに分割して並列でattentionを求める層をmulti-head attentionと呼びます。
実際にmulti-head attentionを実装してしてみましょう。headの次元を入れ替えることだけ注意すると、他は上図右部の通りで実装できます。
from tensorflow.keras.layers import (
    Layer,
    Dense,
)


class MultiHeadAttention(Layer):
    def __init__(self, emb_dim=256, head=8, name="multi_head_attention"):
        super().__init__(name=name)
        self.emb_dim = emb_dim
        self.head = head

        assert emb_dim % head == 0

        self.depth = emb_dim // head

        self.q_dense = Dense(units=emb_dim)
        self.k_dense = Dense(units=emb_dim)
        self.v_dense = Dense(units=emb_dim)

        self.last_dense = Dense(emb_dim)

    def _split_head(self, inputs, batch_size):
        """
        split input to suit each head attention
        input:
        inputs=shape(batch, emb, ?)

        output:
        outputs=shape(batch, head_number, ?, emb_in_each_head)
        scaled dot-product attentionは最後の次元のみ計算に使うので、headの次元を前に持ってくると効率的にmulti-head attentionを求められる
        """
        inp = tf.reshape(inputs, shape=(batch_size, -1, self.head, self.depth))
        return tf.transpose(inp, perm=[0, 2, 1, 3])

    def call(self, inputs):
        q, k, v, mask = inputs['query'], inputs['key'], inputs['value'], inputs['mask']
        batch_size = tf.shape(q)[0]

        # split heads
        q = self.q_dense(q)
        q = self._split_head(q, batch_size)

        k = self.k_dense(k)
        k = self._split_head(k, batch_size)

        v = self.v_dense(v)
        v = self._split_head(v, batch_size)

        attention = scaled_dot_product_attention(q, k, v, mask)

        # concat heads
        attention = tf.transpose(attention, perm=[0, 2, 1, 3])
        attention = tf.reshape(attention, (batch_size, -1, self.emb_dim))

        outputs = self.last_dense(attention)
        return outputs
Positional Encoding
次に、Positional Encodingの実装をしていきます。 Multi-head attentionやtransformerの全体構造を見て分かる通り、系列データを扱うにも関わらず、実際にはRNN型のモデルはどこにも現れてきません。これは効率的に計算できるというメリットもありますが、系列の順序情報は含ませたいです。そこで埋め込み表現に順序の情報を含める試みがPositional Encodingになります。 式は、
この式で算出される値を埋め込みベクトルに加えていきます。 実装は以下になります。
class PositionalEncoding(Layer):
    def __init__(self, position, emb_dim):
        super().__init__()
        self.pos_encoding = self._positional_encoding(position, emb_dim)

    def _get_angles(self, position, i, emb_dim):
        """
        assign position, i and emb_dim to the expression of the angle of positional encoding formulae
        outputs: shape=(position.shape[0], i.shape[1])
        """
        denominator = 1 / tf.pow(10000, (2 * (i // 2)) / tf.cast(emb_dim, tf.float32))
        return position * denominator

    def _positional_encoding(self, sentence_length, emb_dim):
        """
        inputs:
        sentence_length: int
        emb_dim: int

        outputs:
        output: shape=(1, sentence_length, emb_dim), float32
        """
        # 計算を効率化するためにpositionとiを行列にしてangle計算を行列の積で一度に実行する
        angle = self._get_angles(
            position=tf.expand_dims(tf.range(sentence_length, dtype=tf.float32), -1),
            i=tf.expand_dims(tf.range(emb_dim, dtype=tf.float32), 0),
            emb_dim=emb_dim
        )

        # インデックスが偶数のものはサイン関数に適応
        sine = tf.math.sin(angle[:, 0::2])
        # インデックスが奇数のものはコサイン関数に適応
        cos = tf.math.cos(angle[:, 1::2])

        pos_encoding = tf.concat([sine, cos], axis=-1)
        pos_encoding = tf.expand_dims(pos_encoding, 0)
        return tf.cast(pos_encoding, tf.float32)

    def call(self, inputs):
        """
        inputs: shape=(batch, sentence_length, emb_dim)
        """
        return inputs + self.pos_encoding[:, :tf.shape(inputs)[1], :]
encoding layer

from tensorflow.keras import Input, Model
from tensorflow.keras.layers import (
    Dropout,
    LayerNormalization,
    Dense,
)
def encoder_layer(units, emb_dim=256, head=8, dropout=0.5, name='encoder_layer'):
    inputs = Input(shape=(None, emb_dim), name="inputs")
    padding_mask = Input(shape=(1, 1, None), name="padding_mask")

    # self multi head attention and dropout
    self_attention = MultiHeadAttention(emb_dim=emb_dim, head=head, name="attention")(
        {
            'query': inputs,
            'key': inputs,
            'value': inputs,
            'mask': padding_mask
        }
    )
    self_attention = Dropout(rate=dropout)(self_attention)

    # Add & Norm
    attention = LayerNormalization(epsilon=1e-6)(inputs + self_attention)

    # feed forward
    ff = Dense(units=units, activation='relu')(attention)
    ff = Dense(units=emb_dim)(ff)
    ff = Dropout(rate=dropout)(ff)

    # Add & Norm
    outputs = LayerNormalization(epsilon=1e-6)(attention + ff)

    return Model(inputs=[inputs, padding_mask], outputs=outputs, name=name)
encoder
ここまでくれば、encoderを実装できます。 入力を埋め込んで、positional encodingをして、encoder layerに入力します。
from tensorflow.keras.layers import Embedding


def encoder(vocab_size, num_layers, units, emb_dim=256, head=8, dropout=0.5, name='encoder'):
    """
    emb -> positional_encoding -> some encoder_layer
    """
    inputs = Input(shape=(None, ), name="inputs")
    padding_mask = Input(shape=(1, 1, None), name="padding_mask")

    emb = Embedding(vocab_size, emb_dim)(inputs)
    emb *= tf.math.sqrt(tf.cast(emb_dim, tf.float32))
    emb = PositionalEncoding(vocab_size, emb_dim)(emb)

    outputs = Dropout(rate=dropout)(emb)
    for i in range(num_layers):
        outputs = encoder_layer(
            units=units,
            emb_dim=emb_dim,
            head=head,
            dropout=dropout,
            name="encoder_layer_{}".format(i)
        )([outputs, padding_mask])

    return Model(inputs=[inputs, padding_mask], outputs=outputs, name=name)
decoding layer

次に、decoding layerです。encoderの出力が2つ目のattentionの入力になることと、1つ目のattentionの入力は因果関係を考慮して未来の入力を無視するlook ahead maskingを施すことに注意して、以下のように実装できます。
def decoder_layer(units, emb_dim=256, head=8, dropout=0.5, name='decoder_layer'):
    inputs = Input(shape=(None, emb_dim), name="inputs")
    encoder_outputs = Input(shape=(None, emb_dim), name="encoder_outputs")
    padding_mask = Input(shape=(1, 1, None), name="padding_mask")
    look_ahead_mask = Input(shape=(1, None, None), name='look_ahead_mask')


    # self multi head attention and dropout
    self_attention = MultiHeadAttention(emb_dim=emb_dim, head=head, name="attention_1")(
        {
            'query': inputs,
            'key': inputs,
            'value': inputs,
            'mask': look_ahead_mask
        }
    )

    # Add & Norm
    attention1 = LayerNormalization(epsilon=1e-6)(inputs + self_attention)

    attention2 = MultiHeadAttention(emb_dim=emb_dim, head=head, name="attention_2")(
        {
            'query': attention1,
            'key': encoder_outputs,
            'value': encoder_outputs,
            'mask': padding_mask
        }
    )
    attention2 = Dropout(rate=dropout)(attention2)

    # Add & Norm
    attention = LayerNormalization(epsilon=1e-6)(attention1 + attention2)

    # feed forward
    ff = Dense(units=units, activation='relu')(attention)
    ff = Dense(units=emb_dim)(ff)
    ff = Dropout(rate=dropout)(ff)

    # Add & Norm
    outputs = LayerNormalization(epsilon=1e-6)(attention + ff)

    return Model(inputs=[
        inputs,
        encoder_outputs,
        look_ahead_mask,
        padding_mask
    ], outputs=outputs, name=name)
decoder
decoderもencoderとほぼ同様です。
def decoder(vocab_size, num_layers, units, emb_dim=256, head=8, dropout=0.5, name='decoder'):
    """
    emb -> positional_encoding -> some decoder_layer
    """
    inputs = Input(shape=(None, ), name="inputs")
    encoder_outputs = Input(shape=(None, emb_dim), name="encoder_outputs")
    padding_mask = Input(shape=(1, 1, None), name="padding_mask")
    look_ahead_mask = Input(shape=(1, None, None), name='look_ahead_mask')


    emb = Embedding(vocab_size, emb_dim)(inputs)
    emb *= tf.math.sqrt(tf.cast(emb_dim, tf.float32))
    emb = PositionalEncoding(vocab_size, emb_dim)(emb)

    outputs = Dropout(rate=dropout)(emb)

    for i in range(num_layers):
        outputs = decoder_layer(
            units=units,
            emb_dim=emb_dim,
            head=head,
            dropout=dropout,
            name="decoder_layer_{}".format(i)
        )([outputs, encoder_outputs, look_ahead_mask, padding_mask])

    return Model(inputs=[
        inputs,
        encoder_outputs,
        look_ahead_mask,
        padding_mask
    ], outputs=outputs, name=name)
transformer
いよいよ、モデルの完成です。ここまでに実装したものを総結集します。
from tensorflow.keras.layers import Lambda
def transformer(vocab_size, num_layers, units, emb_dim=256, head=8, dropout=0.5, name='decoder'):
    inputs = Input(shape=(None, ), name="inputs")
    decoder_inputs = Input(shape=(None, ), name="decoder_inputs")

    encoder_padding_mask = Lambda(create_padding_mask, output_shape=(1, 1, None), name="encoder_padding_mask")(inputs)
    decoder_padding_mask = Lambda(create_padding_mask, output_shape=(1, 1, None), name="decoder_padding_mask")(inputs)
    look_ahead_mask = Lambda(create_look_ahead_mask, output_shape=(1, None, None), name='look_ahead_mask')(decoder_inputs)

    encoder_outputs = encoder(
        vocab_size=vocab_size,
        num_layers=num_layers,
        units=units,
        emb_dim=emb_dim,
        head=head,
        dropout=dropout,
    )(inputs=[inputs, encoder_padding_mask])

    decoder_outputs = decoder(
        vocab_size=vocab_size,
        num_layers=num_layers,
        units=units,
        emb_dim=emb_dim,
        head=head,
        dropout=dropout,
    )(inputs=[decoder_inputs, encoder_outputs, look_ahead_mask, decoder_padding_mask])

    outputs = Dense(units=vocab_size, name="outputs")(decoder_outputs)

    return Model(inputs=[inputs, decoder_inputs], outputs=outputs, name=name)
グラフ生成
NUM_LAYERS = 2
EMB_DIM = 256
NUM_HEADS = 8
UNITS = 512
DROPOUT = 0.1
Vocab size = 8113

sample_transformer = transformer(
    vocab_size=VOCAB_SIZE,
    num_layers=NUM_LAYERS,
    units=UNITS,
    emb_dim=EMB_DIM,
    head=NUM_HEADS,
    dropout=DROPOUT)

tf.keras.utils.plot_model(sample_transformer)

以上でモデルは構成できました。
長くなったのでここでPart.1終了とします。
loss, optimizer, metricsや学習データについては、Part. 2で!